
Cricut Design Space is a software program that allows you to create, edit and share your own Cricut projects.
It is also a place where you can buy, sell and trade your Cricut designs. Design Space is the platform for all Cricut projects including scrapbooking, cardmaking, and paper crafting.
You can use it to make your own designs or simply browse and find the latest Cricut projects online.
Design Space is the home of the Cricut machine and the place where you can get everything you need to create your own project.
The Cricut Design Space app allows you to create, edit and share your own Cricut projects. You can import, export, and view your projects from Design Space on any iPad, iPhone, or Android device.
Design Space gives you a wide variety of tools to help you create your project. Design Space also offers you the ability to purchase and sell your Cricut projects.
An introduction to utilizing Design Space for Cricut print and cut is provided in this tutorial.
Cricut Design Space
Design Space is easy to navigate and use. You can start by creating a free account, then choose your profile picture.
After you sign up, you will receive an email with your login information and your personal access code. You can also use your Facebook account to log in.
When you first log into the Design Space App, you will be taken to the Cricut Design Space home screen.
You can find all of your projects in the My Projects tab. This is where you will find all of the projects that you have created in Design Space.
Any image you upload can be printed and cut using Cricut Design Space. Therefore, anything that can be placed on the canvas area, where you design, is suitable for printing and cutting.
Print then cut is not just for cutting out shapes and designs; you may create and design whatever text you want before printing it.
Here is how to utilize Design Space step-by-step:
Steps to Use Cricut Design Space for Print then Cut
A Cricut Design Space tool called Print then Cut enables you to print a picture and then cut it out using your personal printer. Print and cut is referred to as “Print then Cut” exclusively by Cricut.
Upload the Image to a Workspace

The initial step is to upload the image to a workspace after Cricut Design Space has been loaded on your device.
Two choices are available. You can either choose a design image from your device or alter and upload an image from Design Space’s library.
The picture source will be requested when you click the upload image button. Ensure that you save it as a print and cut image rather than a cut image.
A new window will open once you click on the upload image and prompt you to select the file from your computer.
Double-click the image to upload it after conducting a search.
Since we are working with a JPG file, not every component of the image is recognized by Cricut. Only a sizable square is detectable by Cricut.
Cleaning the Image

There are various ways to clear up the file. I advise you to experiment with them to determine which one works best for your specific photograph.
The Remove Background button gets rid of a lot of the features in this image, but it works excellently in other situations.
Using the tiny Magic Wand to the left of the window is my go-to method for enhancing JPG photographs.
To remove all of the selected colours (let’s suppose pink) areas, choose the Magic Wand and then click on each one of them.
To eliminate all pink, you will need to click a few times. Click continue once you’re done.
The settings for colour tolerance and the number of colours are likewise programmable; the higher the number, the more details the wand will erase.
Click “Apply & Continue” once all of the backgrounds has been removed.
Inserting the image into the Design Space canvas comes next. It is the location where you can edit the image’s size, colors, and form before printing.
Adding Shapes – Shapes Make Design Cool
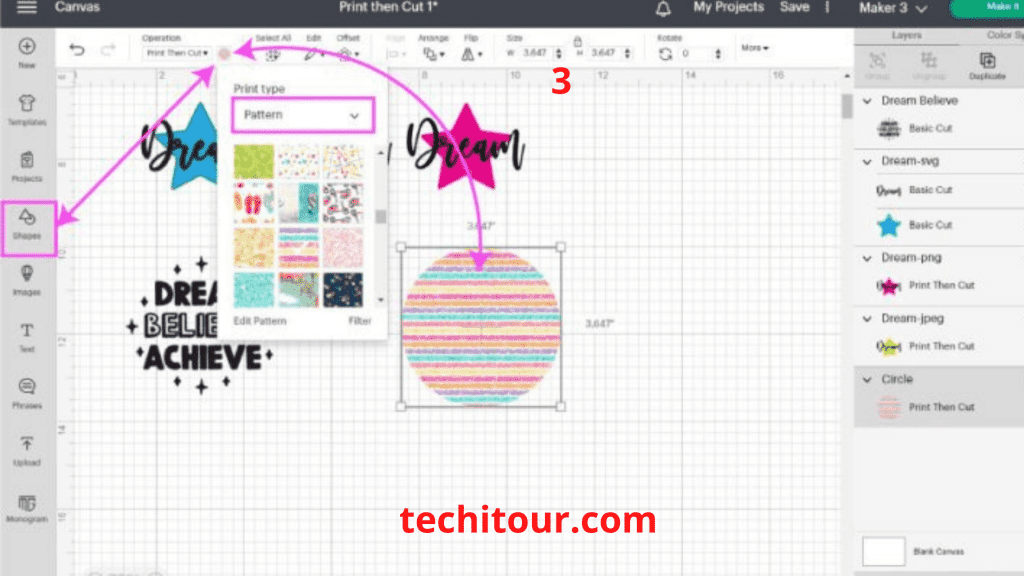
The canvas’ left-hand menu has a shapes option as seen in the image above. To view a variety of forms, including a circle, hexagonal rectangle, and many others, click on them.
You can choose the form in accordance with the geometry you want your finished design to have.
A helpful hint is to always check that your printable image is exactly centered on the shape that will be printed.
This means that if you have selected a circle for your design, then you must center the image you are printing around the circle.
Adding Text – Text Enhances Any Design So Much

Click on the text icon on the left side of the canvas to add it.
You probably want the text to be together if you are using paper. The Cricut will cut each letter if the word is left alone; if this is what you want, excellent.
Place the word on top of a form, though, if you want it to stay intact as a whole.
Cricut Explore Air 2 Machine Bundle Iron On Vinyl Pack Tools Pen Design Guide
Use Offset tool to Enable your Creativity

The “Offset” tool is one of the finest ones you can utilize for Print Then Cut.
Offset” is the ideal tool for creating all kinds of stickers and other Print Then Cut projects since it enables you to create a proportional outline inside and outside of the text, images, and forms.
Offset allows you to create text outlines on top of the photos, shapes, and other graphics you need to print then cut.
After using this great offset tool for some time, you will be able to create your own text outlines with ease.
This is a great tool for those who want to make their own Print Then Cut project. I created a simple 3D object to demonstrate how to create a text outline using Offset.
Do you Know
Every time you insert an image to be printed, it prints with borders known as bleed. By default, the black line border serves as a cutting guide for the Cricut.
Although printing an image with bleed is optimal, you can prevent having black borders by disabling bleed. In either scenario, you will remove this bleed after cutting the picture in Cricut.
Now Print the Image

The combined Cricut print and cut process can only be used with a compatible printer and Cricut model.
Since the image has already been uploaded, placed, and enhanced with colours and shapes. We will now use the printer linked to the Cricut to print the image.
To print the picture, click Make it. We must choose a typical option among operations (print and cut).
The design for the mat will emerge on a new screen after you click “Make it.” This command is printed and then cut, in other words.
For the Cricut sensor to recognize the image to cut around, there should be an external black border surrounding it.
When you select Continue, a question about your current Cricut machine model will appear. It can be an Explore Air or a Cricut Maker.
When send to printer appears after clicking Continue, you must choose the printer that is connected to your Cricut machine.
Note that Cricut Joy does not support print and cut. This service is only available with the maker or Explore air.
Want to know the Top 10 Best Inkjet Printer for Vinyl Stickers in 2023
Lastly, Choose the Material and Activate Print then Cut
We have finished printing. Choose the substance on which our design has previously been printed. The material to be cut will be detected by Cricut.
The mat and image are placed under the Cricut machine in the last stage to cut the precise design of your choice.
Place the printed product on the mat, attach the fine point blade, and insert it into the Cricut machine.
Press the flashing go button to begin the cut after loading your mat.
You will see the miracle take place right now!
The Print Then Cut sensor will activate, reading the frame surrounding each of the parts we need to cut out before the Cricut begins cutting them all out.
Unload your mat and take the project out of it when Design Space notifies you that the cut is complete.
Final Words
So, if you want to print then cut from Cricut Design Space, all you need to do is follow the instructions above. Make sure that you have your printer and Cricut machine set up properly, and then simply select the ‘print then cut’ option from the menu. Your Cricut will do the rest!
Printing just from Cricut Design Space when using print then cut is another crucial consideration. You won’t obtain realistic results if you try to print images from unreliable sources and then cut them with a Cricut.
The use of resources will be wasted if you switch browsers or turn off the computer in the middle of printing and cutting.

Rhea James is a dedicated researcher. I’m fascinated by office items and enjoy learning more about them so that you can simplify your workday.
On this website, I share all of my personal experiences and ideas, as well as the best products, information, and shopping advice.
If you enjoy my product reviews and writing, please share them.
Keep Visiting, and keep Shining.